
Do you ever have problems seeing the text, photos, or other elements on your iPhone or iPad? Do you have trouble seeing things in the real world or reading? If so, both problems can be resolved using your Apple iPhone. Certain capabilities included in tablets and smartphones are intended to assist those with vision impairments or associated issues.
To improve screen legibility, you can adjust the color options and font size on the iPhone and iPad. To make screens and apps easier to read in low light, the dark mode applies a darker hue to them. You can adjust the Zoom tool to magnify specific regions of the screen for enhanced visibility of text, graphics, and navigation elements. Using the camera on your device, the Magnifier tool improves your close-up vision of items and can even recognize objects, people, and situations.
Enter the Dark Mode
You may now choose to use a system-wide dark mode on your iPhone and iPad, which converts text from black to white and changes the color of menus and apps from brilliant white to a deeper tone. This feature has been available on your devices since 2019. This can frequently improve the screen’s readability and visibility, particularly at night or in dimly lit areas. Go to Settings > Display & Brightness, then tap the Dark symbol to manually activate Dark Mode.
As an alternative, the Control Center allows you to enable and disable dark mode. To access the Dark Mode button, swipe down from the top-right corner of the screen (or up from the bottom on earlier phones). Additionally, you may activate the brightness control by pressing down on it. Now, the screen is dark and the text is white when you launch some programs, such as Mail, Music, Calendar, or some third-party apps.
Even though you might enjoy using Dark Mode, you might only want to do so in specific situations, including at night in a smaller space. If so, just program it to turn on and off on its own at predetermined intervals. Select Automatic by going back to Settings > Display & Brightness. To program the timetable to run from dusk to dawn, tap Options.
Select Custom Schedule to set the hours that you want Dark Mode to be on and off for more control. To verify and confirm the times you chose for Dark Mode, return to the previous screen.
Modify the Text Size
You can enlarge and make the writing on the screen easier to read if you’re experiencing problems seeing it. Navigate to Settings > Display & Brightness > Text Size, then adjust the text size by dragging the slider to the right. To make all of the text on your phone bold, you can also enable bold text.
By looking at the sample text, you may observe the difference that your adjustments have created. But navigate between screens and launch different programs to get the full impact. It’s probably a good idea to adjust the text size till it’s comfortable for your eyes.
Adjust the Contrast of Colors
Changing the color contrast on the screen is another approach to reduce eye strain. Navigate to Settings > Accessibility > Display & Text Size to evaluate the available options. This screen provides buttons to apply a bold appearance and adjust the text size. However, you ought to look at the other options as well.
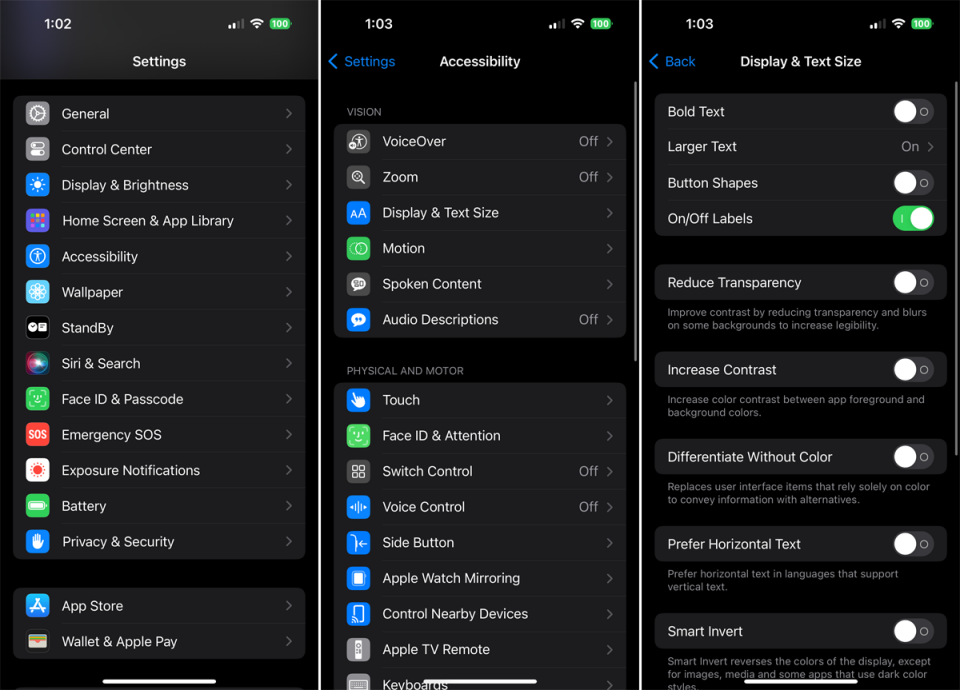
To intensify the colors between the background and foreground, turn on Increase Contrast. For those who suffer from various forms of color blindness, the Differentiate Without Color switch provides an alternative to screen elements that solely rely on color. Screen elements with options like Smart Invert and Classic Invert employ colors that are reversed.
For those of you with certain types of color blindness, tapping the Color Filters option will provide you with more options to discern between different hues. Activate the Colors Filters option, and then select a filter for the particular colors you find difficult to see. Additionally, you can change the filter’s intensity.
Use the Reduce White Point slider and switch to lessen the intensity of vivid colors. Additionally, Auto-Brightness adjusts the screen’s brightness in response to your environment.
Make use of the Zoom Tool
Not able to read the small text on the screen? Zoom is an integrated magnification feature that comes with your smartphone. It lets you zoom in close to read text and images on your screen more clearly. Navigate to Settings > Accessibility > Zoom and flip the switch next to Zoom to activate the feature.
A little window will appear and zoom in on the area of the screen that it is positioned on. The Zoom window can be moved by dragging the little bar at the bottom of the window. To adjust which area is zoomed in, you can also swipe up and down on the screen.
When the Follow Focus button is used, the Zoom window follows your typing as it travels to the text. When Smart Typing is enabled, the Zoom window is moved to make text appear zoomed in while the keyboard remains normal.
To move the Zoom window around the screen, tap Zoom Controller and activate Show Controller. This will bring up a circular on-screen controller. A menu containing choices to zoom out, select the zoom region, adjust the zoom lens, select a filter, and conceal the controller will appear when you tap the controller.
To zoom in and out, select Zoom Out/In. To select from a variety of zoom choices, tap Choose Region:
Pinned Zoom: The top, left, right, or bottom of the screen can be where your zoom window is pinned.
Full-Screen Zoom: This causes the screen to zoom in its entirety while making the Zoom window vanish.
Window Zoom: As you move the screen around, you may zoom in on a tiny area of it using the Zoom window.
Make Use of the Magnifier Tool
You can use your iPhone or iPad as a magnifier to get a better look at the surroundings. Using the camera as a magnifying glass, the built-in Magnifier tool enlarges images. The Magnifier can be used to enlarge items that are closer to you, such as text in a book or on a computer screen, or to improve your vision of distant objects.
Open the Magnifier app from the Home screen on your iPhone or iPad. Alternatively, if it’s not already there, add it to Control Center. Go to Settings > Control Center to accomplish this. Click the magnifier green symbol in the More Controls area. After that, slide up or down to reveal Control Center, then hit the magnifier symbol.
Take note of how everything in the viewfinder of your camera is enlarged. To zoom in and out of the object, use the Magnifier panel’s slider or squeeze and extend your fingers. To adjust the brightness, tap the brightness symbol and move the slider in either direction. To disable the Brightness slider, tap the symbol once more.
Press the Filter icon to select an appropriate filter that enhances the object’s clarity. To disable the Filter gallery, tap the icon once more. To turn on your device’s flashlight and shine extra light on the object, tap the Flashlight icon.
To take a picture of the item you are looking at, click the Shutter button. After that, by tapping the View button, you can see any pictures you take. Navigate through the thumbnails of the photos you’ve taken, then tap an individual image to see it. To share an image via an app with someone else, you can also tap the Share icon from this screen. To go back to the Magnifier screen, tap End.
Through a feature called Detection Mode, you may even use the Magnifier to identify and describe persons and objects; however, an iPhone or iPad with a LiDAR Scanner is required. This refers to an 11-inch Pad Pro (2nd generation and after), a 12.9-inch iPad Pro (4th generation and later), or an iPhone 12 Pro or 12 Pro Max or later model.
Open Magnifier, hit the Settings button in the lower left corner, and choose Settings from the menu to add Detection Mode. To add Detection Mode to the list of secondary controls in the Other Controls section, press the plus symbol and select Done.